{
  "R": {
    "Version": "4.3.1",
    "Repositories": [
      {
        "Name": "CRAN",
        "URL": "https://packagemanager.posit.co/cran/latest"
      }
    ]
  }
}Reproducible environments. If you’re primarily a Pythonista, you’re likely already familiar with the necessity. And the horror. XKCD said it best:
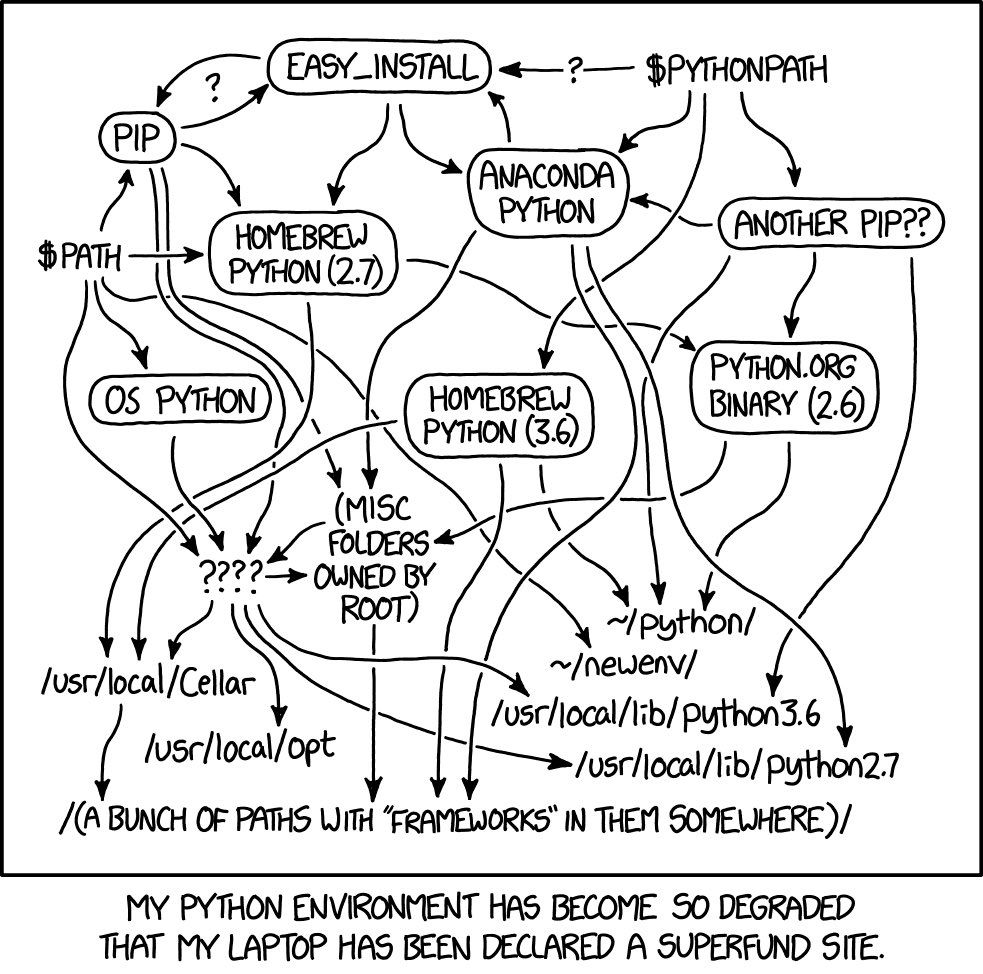
If you’re primarily an R user, you might not be familiar with either the necessity or the horror of reproducible environments. This post is about facilitating the former and minimizing the latter. I’ve written this primarily for R users, especially those who, like me, find themselves supplementing their existing R workflows with Python. We’ll focus on using {renv} to create reproducible environments for R and Python, along with pyenv and some venv.
What is a reproducible environment?
You already work in an environment. It’s composed of the packages you use and their dependencies along with R and Python for a given project. What makes it reproducible is keeping track of which version of those packages, their dependencies, and R and Python you’re using for your given project. While “keeping track” could happen in many different ways, ideally you want to keep track of your environment such that it can be easily reproduced on another machine, by you (including future you) or someone else.
Okay, but why? Packages change. Functions get deprecated. And R and Python continue to evolve. Just because your project code works now doesn’t mean that it will work for someone else or in the future. (Technically, your environment could be extended to your operating system version as well, depending on the project, but worrying about machine images is beyond the scope of this post.) Ensuring your project environment is reproducible enables collaboration, future-proofing, and open science.
R
There are a number of ways to create reproducible environments in R, but {renv} recently reached 1.0.0 and has a streamlined workflow that helps minimize the horror for both R and Python (more on Python in a bit).
As an R user, you should already be familiar with working in a project. Once you have {renv} installed, get started with making your project environment reproducible by calling renv::init(). This will create two essential items in your project’s working directory:
- A lockfile called
renv.lock. - A project library called
/renv.
More on both of these in a minute. An .Rprofile file is also created that will automatically run when you open your project and make sure you’re using the correct reproducible environment. If for whatever reason you don’t get a prompt in the Console saying that {renv} is running when you open your project after it’s been initialized, you may have to jump start this by calling renv::load(). Also, please note that if you’re using some sort of version control, you’ll commit all three of these additions to your project (an automatically generated /renv/.gitignore file will make this simple if you’re using Git).
It will help to think about creating a reproducible environment in two parts:
- The version of R you’re using for your project.
- The version of the packages (and dependencies) you’re using for your project.
Let’s discuss each in turn.
Version
If you’re like me, you don’t often think about which version of R you’re using. I often wait for a little while after a new version is released to make sure there aren’t any breaking problems with the packages and software I use most (I’m looking at you, compilers). I also find myself reminding students to not update to the most recent version of R mid-semester for that same reason. You probably just update R a few times a year, maybe notice the version number and its cute Peanuts-themed release name when you open a new instance, and call it good.
When you called renv::init(), the first thing that was recorded in the renv.lock lockfile (which tracks the versions of everything to make your environment reproducible) was the version of R you’re using. The lockfile is a json, and those details will look something like this:
While {renv} records this information to track your R version, it can’t really help you or a collaborator get this version of R because {renv} is running inside of R. However, this probably isn’t an issue. You likely only have a single version of R installed at any given time. When you update R, you likely overwrite the old version with the new version. And that’s probably enough. R is a specialized language that the operating system isn’t using elsewhere and has from its beginning been committed to remaining backwards compatible. All of which to say, a version of R that is at least as current as the one you’re using for your project will likely be sufficient for others, including future you.
That said, if you find yourself needing to maintain multiple versions of R on the same computer, you’ll want to invest the time in an R version management tool like rig.
Packages
I also don’t often think about which version of packages I’m using (shocker, I know). Maybe you’re similar. You might update your packages when prompted or update manually once a year. Much like most R users maintain a single version of R, by default all packages are installed in a single, global library (a library is simply a directory with installed packages) known as the system library. When you called renv::init(), the /renv folder that was created is your project library. This helps highlight an important feature of reproducible environments: Each project will have its own project library and thus be isolated. If two projects use different versions of the same package, they won’t conflict with each other because they’ll each have their own project library.
Well, not exactly. {renv} uses something called a global package cache. You only ever need to install the version of a given package once. If that same version is needed for another project, {renv} will just link your project library to the corresponding package version in that global cache.
So how do you track the version of the packages and their dependencies for your project? Once you’ve installed the packages you need for your project, call renv::snapshot(). This takes a snapshot of your package version and records them in the lockfile, along with the R version as shown above. Whenever you add new packages, or update the version of packages you’re using, call renv::snapshot() again to update the lockfile accordingly. When someone else is trying to reproduce your environment, once they have your project working directory, they simply need to call renv::restore() to install the correct version of the required packages.
TipNon-Standard Repositories
If a package you’re using has a non-standard repository (i.e., not on CRAN or another supported repository network), you’ll need to update the renv.lock file to ensure the environment remains reproducible. When you open a project, renv::status() will run and tell you if a repository you downloaded a package from is non-standard.
For example, for Stan packages, the R entry in the json renv.lock file will need to include:
{
  "R": {
    "Version": "4.3.1",
    "Repositories": [
      {
        "Name": "CRAN",
        "URL": "https://packagemanager.posit.co/cran/latest"
      },
      {
        "Name": "Stan",
        "URL": "https://mc-stan.org/r-packages"
      }
    ]
  }
}
I’ve tried to provide enough detail to explain why {renv} works the way it does, but the workflow itself remains simple. Let’s review:
- Create a new lockfile and project library once by calling
renv::init(). - Track installed package versions, and any changes to the project library, using
renv::snapshot(). - Reproduce the environment on another machine by installing the correct project library with
renv::restore().
There are many other functions available to manage specific problems or are at work behind the scenes. For example, whenever you open a new instance of a given project that uses {renv}, renv::status() will automatically run to check for inconsistencies between the lockfile and what is available in the given project library. When issues are found, follow the prompts to address them. This may mean calling renv::restore() to get certain packages installed or using renv::snapshot() to resolve inconsistencies between what is actually being used in your project’s code and what is being tracked in the lockfile.
Python
There are even more ways to create reproducible environments in Python than there are in R. Since this is written primarily for R users who are supplementing their workflows with Python, we’ll continue using {renv} while adding pyenv and showing how {renv} works with venv. That’s a lot of envs, so let’s get to it. Again, it’s helpful to think about creating a reproducible environment in two parts:
- The version of Python you’re using for your project.
- The version of the packages (and dependencies) you’re using for your project.
Let’s address each of these in turn.
Version
Unlike R users, Pythonistas have always had to worry about which version of Python they’re using. There are a number of reasons for this, and a few will provide some helpful context:
- Python is a big tent with many different uses beyond data science. More uses and users has resulted in a plethora of opinionated approaches to versions and environments.
- Not all Python versions are (or were) backwards compatible.
- Most importantly, Python comes pre-installed on many operating systems since some of the actual operating system uses that specific version of Python. This is a version you should not use for any of your project work.
For all of these reasons (if not the last one alone), you need the ability to maintain multiple versions of Python on the same computer, which means you should invest the time to learn how to use a Python version management tool. While there are many version management tools, I recommend pyenv, which is designed to be as simple as possible. Though what constitutes “simple” is a matter of experience and your mileage may vary.
WarningPython Version Management
Python version management is where the horror happens. This is true for R users, but remember that it’s also true for Python users (re: the XKCD comic above). While pyenv is simple, it will require you to use the command line (i.e., terminal or shell). Be patient and take your time walking carefully through the installation instructions. Daniel Chen, who introduced me to pyenv, also has a great write-up of the installation instructions that may be a bit easier to follow. A few things to help as you install:
- The command line is the programming interface into your operating system itself. You don’t have to know everything about it to follow instructions.
- When you get to the section Set up your shell environment for pyenv, the instructions are different based on the type of command line. If you’re on a Mac that’s running macOS Catalina 10.15.7 or later, the terminal is Zsh. If you’re using Linux, the shell is Bash (and you probably already know that).
Now that you have pyenv installed, you can install and manage all the versions of Python on your computer. To see what versions you already have installed, on the command line, run pyenv versions. At first this is probably just the system version. Note that if you’ve installed Python before pyenv, it won’t be listed: pyenv versions will only list the system version and any additional versions you install using pyenv. To see all the available versions of Python that you can install, run pyenv install --list. This can be overwhelming, but a good place to start is the latest version of Python that has a stable release (i.e., doesn’t have a -dev tag). For example, to install Python 3.11.5, run pyenv install 3.11.5.
Remember how you shouldn’t use the system version of Python? You can set the default version of Python that you’ll use (leaving the operating system to do it’s own thing). For example, to set Python 3.11.5 as the default global version, run pyenv global 3.11.5. If you run pyenv versions again you should see an asterisk by the global default you specified.
There’s a lot more that pyenv can do, but now you should at least be set to safely manage and use Python.
You need to let {renv} know that you’re also using Python for your project along with which version you’re using. (And if you’re working in RStudio, that technically means letting {reticulate} know.) This is a lot like calling renv::init() again, but for the Python parts of your project. You can do this, assuming again that you’re using Python 3.11.5, by calling renv::use_python(python = "~/.pyenv/versions/3.11.5/bin/python3"). Doing this will update the lockfile to include version information for both R and Python, which will look something like this:
{
  "R": {
    "Version": "4.3.1",
    "Repositories": [
      {
        "Name": "CRAN",
        "URL": "https://packagemanager.posit.co/cran/latest"
      }
    ]
  },
  "Python": {
    "Version": "3.11.5",
    "Type": "virtualenv",
    "Name": "./renv/python/virtualenvs/renv-python-3.11"
  }
}
As before, this tracks the Python version but it can’t really help a collaborator or future you get this version of Python. What it can do is let you know which version of Python was used. A version of Python that is at least as current as the one you’re using for your project will likely be sufficient for others, including future you.
However, to ensure that you keep using the same version of Python for your project, you’ll need to add a line to that new .Rprofile file. As a reminder, it’s the file that {renv} added that runs automatically when you open the project. For example, to set 3.11.5 as the default for the project, add Sys.setenv(RETICULATE_PYTHON = "~/.pyenv/versions/3.11.5/bin/python3") on a new line in .Rprofile. Another benefit of using pyenv is that this file path should be the same for anyone else who has 3.11.5 installed (typical file path shenanigans between operating systems aside).
NotePython Virtual Environments (Part One)
Speaking of future-proofing, let’s quickly review how this would work if you were using Python alone. (Well, Python and using the command line only—some of these details might change when working with an IDE or code editor.) This comparison will hopefully help solidify the concepts involved, regardless of your workflow.
If you were just working with Python, after navigating to your project’s working directory in the command line, you would run pyenv local 3.11.5, assuming again you want Python 3.11.5 to be set as the default. This would create a .python-version file in that directory that specified the version of Python to use for that project. This .python-version file is the Python-only workflow equivalent to modifying the .Rprofile file to specify the version of Python {reticulate} should use for that project in the R-and-Python workflow.
Packages
When you called renv::use_python(), a Python project library (also referred to as a virtual environment) was created in the /renv folder using the built-in virtual environment tool that comes with Python called venv. Once again, this will isolate the Python project library for this project from the Python libraries for other projects. Unsurprisingly, Python also employs a global cache to avoid having to install the version of a given package more than once. (If you’ve installed Python prior to using pyenv, you may have a global cache that is borked. You can run pip cache purge in the command line to start fresh.)
Once again, after you’ve installed the packages you need for your project (where you can call the command line from the Python console with a leading exclamation mark, for example !pip install pandas) you will again call renv::snapshot(). This function call will now check and record changes for both R and Python packages in the project. A Python-specific “lockfile” will also be created in the working directory called requirements.txt.
Whenever you add new packages, or update the version of packages you’re using, call renv::snapshot() again to update requirements.txt accordingly. When someone else is trying to reproduce your environment, once they have your project working directory, they simply need to call renv::restore() to install the correct version of the required packages. (Note that as of writing this, renv::restore() may only install the R packages. You may need to install the Python packages manually by calling !pip install -r requirements.txt, even though renv::restore() is designed to do this for you.)
NotePython Virtual Environments (Part Two)
If you were just working with Python (using the command line), after navigating to your project’s working directory in the command line, you would create a virtual environment for your project by running python -m venv venv. This would create a /venv folder in the working directory that contained the project library or virtual environment. This /venv folder is the Python-only workflow equivalent to the /renv folder that {renv} created for us in the R-and-Python workflow.
You would also need to activate this virtual environment whenever you started working in the project by running source venv/bin/activate. To update your lockfile equivalent, you would run pip freeze > requirements.txt (which is actually what renv::snapshot() runs for you). And to install the packages on a new machine, you would run pip install -r requirements.txt (which is actually what renv::restore() should run for you).
Final thoughts
{renv}, pyenv, venv. It’s environments all the way down. Let’s review.
- Use version management tools, a necessity for Python (see pyenv) and an option for R (see rig).
- Create a new lockfile and project library with {renv} by calling
renv::init()once and thenrenv::use_python()once (make sure to specify the version of Python you want to use and update the.Rprofileaccordingly). - Track installed package versions, and any ongoing changes to the project library, using
renv::snapshot(). - Reproduce the environment on a new machine by installing the correct package versions with
renv::restore()(and maybe!pip install -r requirements.txtas needed).
Again, there are many other functions you may need, including renv::status() and renv::repair(), but this should be sufficient to get started on the path to reproducible environments for better collaboration, future-proofing, and open science.